-
Notifications
You must be signed in to change notification settings - Fork 14
How to Use Curly
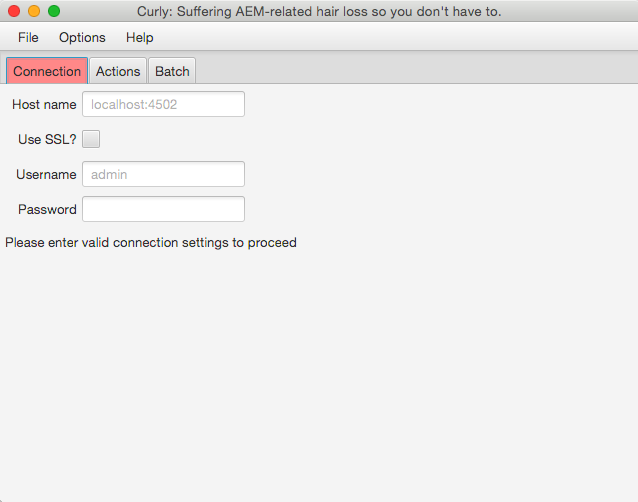
When you start Curly the Connection tab will be open with empty fields prompting you to enter correct connection details to proceed. Once you have filled in the fields and the AEM connection is confirmed, the tab will change from red to green and a success message is presented.

If you need to diagnose any connection issues, brief error messages are provided in the UI but opening the program from the command-line method (described in the "How to Start Curly" page) will allow you access to more detailed application log messages.
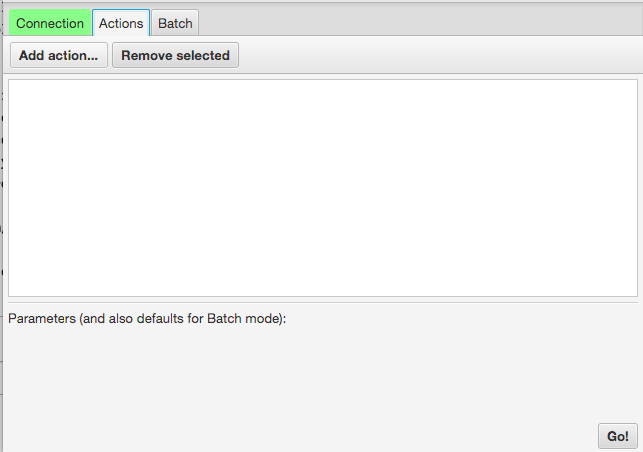
The next tab allows you to add one or more actions, where each action corresponds to one unique HTTP request. Click "Add Action..." to get started.
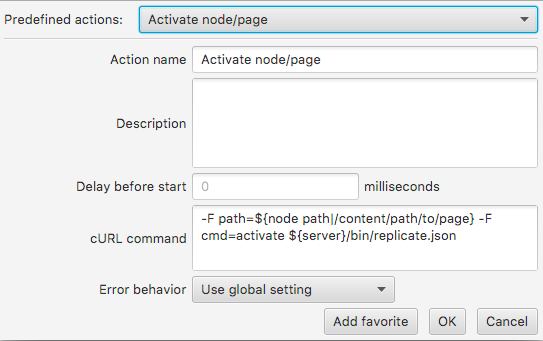
The action editor dialog allows you to select from many pre-defined actions or add your own from scratch. The name is shown elsewhere in the user interface (and reporting) so it's important you adjust the name to be as descriptive but brief as possible. The description field is for your convenience and only appears in this screen and on the actions tab if you hover over an action for a few seconds (as a tooltip).
Delay before start allows you to throttle large batch operations, and is very handy for running large operations against a production server so you don't disrupt normal activity.
Error behavior determines what should happen if the command is unsuccessful, either because the server did not respond or if it returns a processing error response. This is explained in greater detail below.
Action variables are defined within ${...} closures. You can name the variables anything you want (even spaces are allowed!) If you define your variable as ${myVar|value}, a pre-defined value will be offered in the action screen later for you. This is probably more important to note for the existing actions, but these pre-defined values can serve as example values if you're unsure how the variables are supposed to be specified.
Variables are NOT UNIQUE per each action. If you need to specify different variable values for various actions then you must provide unique variable names for each. On the other hand, if you want to pass the same value to multiple actions then you can use the same variable name and this will conveniently abide your request.
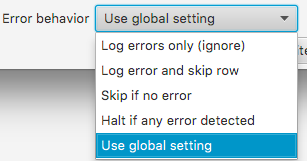
Error behavior allows you to specify what should occur when an error is detected during the run. The default is to use the Global setting, which is selected from the Options menu at the top of the main window. Other options include:
- Log errors only (ignore): This means that errors are tolerated and noted in the report but the next action will be processed
- Log error and skip row: This means all following actions will not be processed. A batch will continue to be processed but no more actions for the current row will be performed.
- Skip if no error: This works like "Log error and skip row" except that an error condition is required to be successful. This provides an edge case such as you want to ensure a node does not exist before continuing with subsequent actions to create the node, upload a file, etc.
- Halt if any error detected: All activity ceases immediately, including batch processing. This is recommended if there is a sensitive operation that must be performed in a specific order, especially if the data is a large batch.
The default global setting is "Log errors only (ignore)" which is the most lenient error behavior.
In this example two actions were added, but I had to change the variable names to match. Activating a node generally requires a node path, but the create node task requires a parent path and node name. In order to use the same variables for both actions, I changed the activation command to use ${jcr node}/${node name} instead of the original ${node path}. Now the same node can be created and then activated without having to specify the path in two different ways.
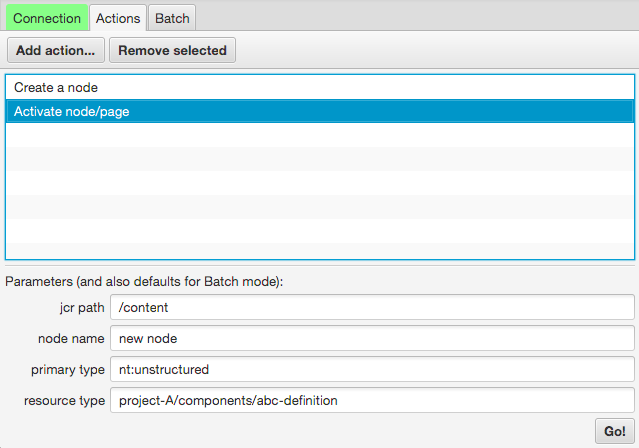
At the bottom of the actions tab, parameter fields are generated for each unique variable. You can fill in all of these values and click "Go!" to run the desired actions. This is useful for quick tasks, but there are cases you will want to run actions multiple times with different values. For this there is a separate batch mode, described in the next section.
Actions can be deleted by selecting one or more actions and clicking the "Remove Selected" button. Also, actions can be rearranged using the mouse to drag and drop actions into the new desired order.